Navigation

Crochet Circle

Showing posts with label crochet projects. Show all posts

Thursday, 3 October 2019

What’s new for crochet this Autumn?

Glitter and sparkle are everywhere this year and not just for parties and dinner dates. I’ve seen glitter threads in winter jackets, trainers and shoes. Sirdar yarn have produced stunning Mystical yarn in a choice of subtle blends  that has a lovely glamorous glitter thread running through it (see scarf pattern in mystical click here).  James Brett have marble chunky glamour with glitter and both warm soft yarns perfect for colder winter days  with a bit of sparkle running through them.

Faux fur is also everywhere including in yarns. Sirdar have a faux fur in fur type colours of greys, mink and browns. If you want something a bit more dramatic you can check out their DK (light worsted) funky faux fur. James Brett also have a well priced faux fur in chunky. Faux fur is not the easiest yarn to use but makes a stunning edging to crochet hats and scarves. 

Velvet is very fashionable this autumn and you can find it used for jackets, smart and casual, dresses, hats and trims. For us crafters you can now find velvet yarns often called chenille. Bernat make a superb crushed velvet yarn, chunky, silky and soft it’s ideal for women’s hats and scarves or perhaps a luxurious cushion. Keep your stitches simple when using chenille or velvet.  I used dc’s(sc’s) and half trebles (half double crochet) as well as a simple tr (dc) or dc(sc) stitch on each row to create a lovely dense and warm texture for a crushed velvet hair band. You could also try using velvet yarns to make chunky corner 2corner crochet for glamorous cushions.

Crocheting on top of pre worked crochet is very popular this season coming out perhaps of the trend for embroidery. It gives us the opportunity to make something simple and quick using perhaps a dc (sc) for a scarf, cowl or cushion and turn it into a striking and original finished item, with crochet on top. Make crochet on top as simple or as complicated as you like, the trick is to use complementary or contrasting yarns. Use a chain stitch to create small flowers, spirals or even writing your name. If you are good at sewing you could embroider on top of your simple scarf to create something eye-catching and truly original for you.

Mosaic crochet maintains its popularity and complexity, not the simplest type of crochet but the results can be simply stunning. Check out ‘Martin up North’ stunning ‘Soulstorm’ blanket or Lilla Bjorn’s Amaya crochet mosaic shawl, an absolute stunner!

Colours this Autumn are deep yellow golds, think saffron and t
urmeric. Have a look at Scheepjes Cahlista in Saffron, Hayfield bonus super chunky in pumpkin and Cascade Heritage in golden yellow.  I’d love to make a blanket using cahlista in saffron with browns and autumn reds.

Finally small items to crochet or crochet on the go maintain their popularity in our busy world. Motifs are the obvious choice, but phone covers, candle cosies and flowers for wreath are easy to make on the go. 

Wednesday, 31 July 2019

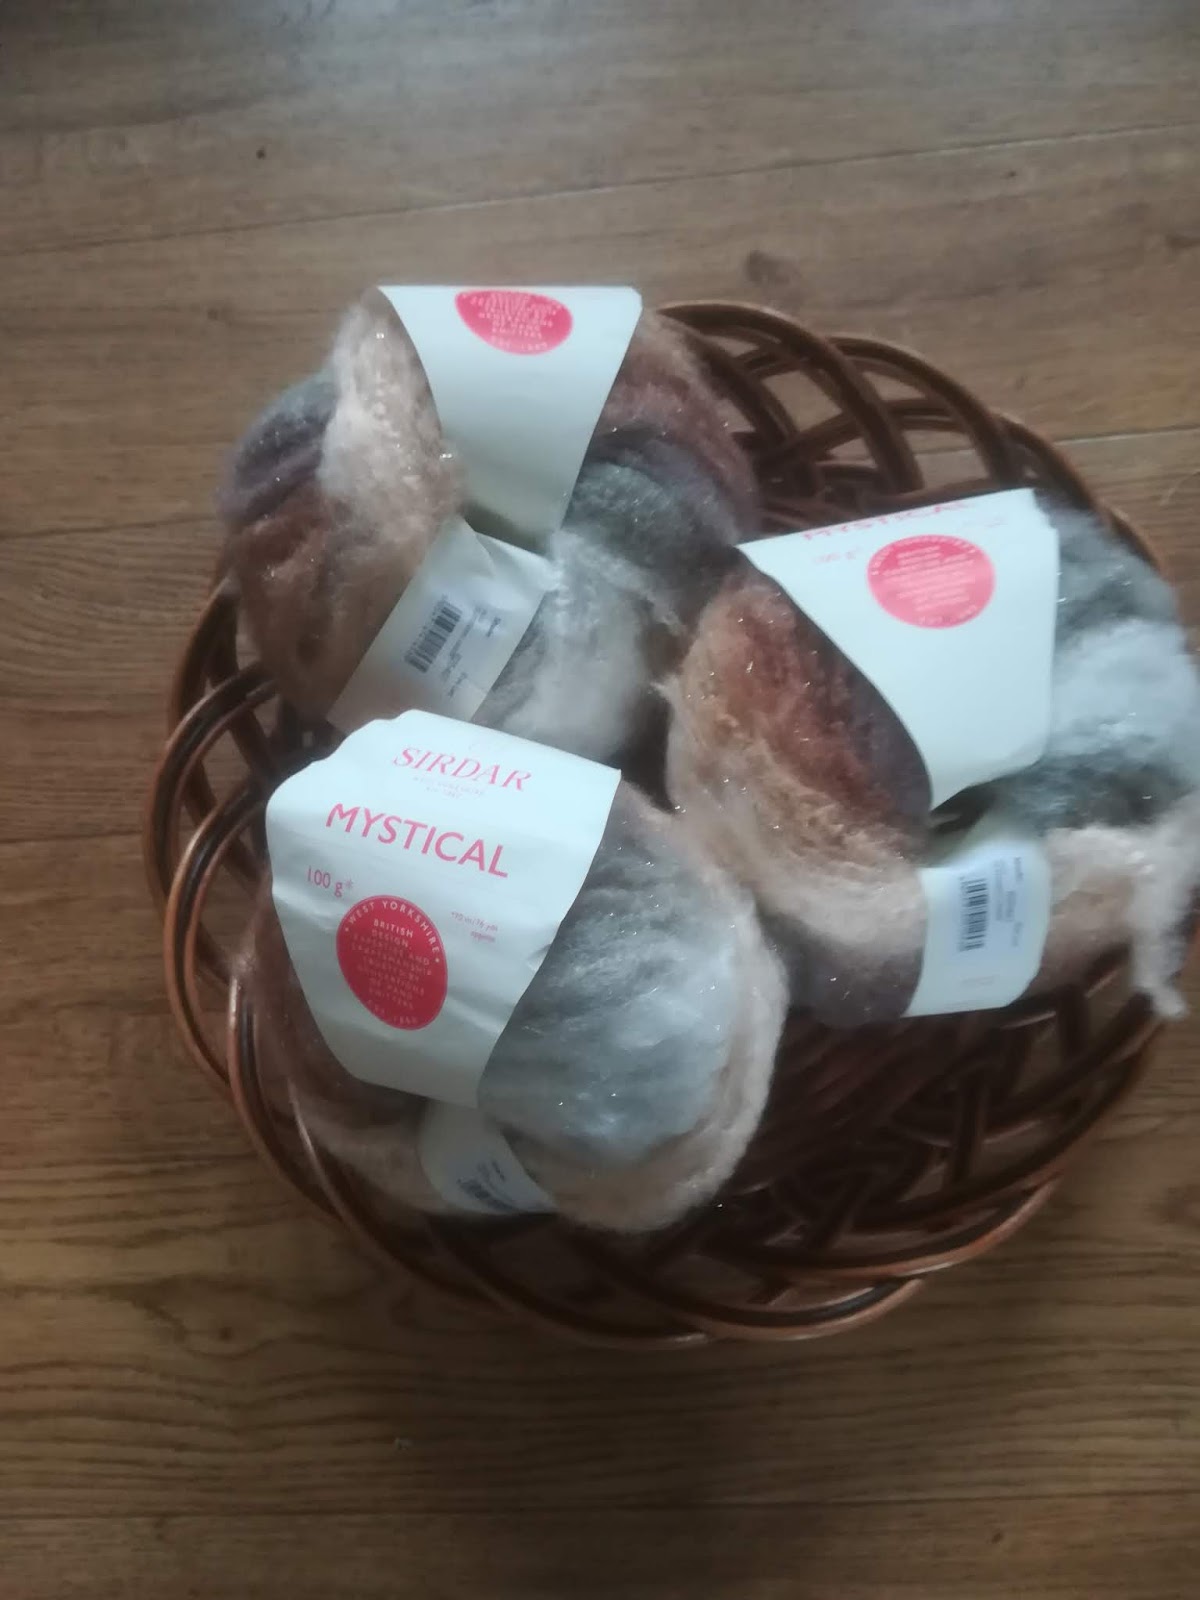
Sirdar Mystical Yarn

Sirdar Mystical is a brushed texture yarn with a silvery thread running through it. It is a self-striping, quick to crochet acrylic and polyester blend yarn that is ideal for all crocheters but particularly for beginners to crochet.

Choose from six colours including fairy dust, glittering amber, twinkling mink, shimmering sapphire and pearlescent pink.  Sirdar mystical is a chunky yarn, I used a 6mm crochet hook to make a cowl scarf. Balls are 100gm and although they appear as a blended yarn they crochet as striping yarns. Each ball gives 70m/76yards.

When worked this yarn gives a dense almost felted finished. surprisngly soft it's perfect for winter scarves, women's jackets, cardigans and winter hats.


Monday, 29 July 2019

Making Crochet Mandalas

Crochet mandala’s come in all colours, sizes and designs but are always round. The word ‘mandala’ means circle. From easy to more complicated and intricate there is a mandala to make for every skill level of crocheter.

Stitches

Almost any crochet stitch can be used in mandalas, front and back posts look particularly good, as do shells, clusters and popcorns and they are commonly use in mandala designs.  Pattern repeats make mandalas easy on the eye and fun to make. Simple edgings add impact and a complete look to mandalas and this might be something as simple as two colours of dc’s (sc’s) using colours from the mandala, or one of my favourites is a final row of slip stitches with 1chain between.
If you are feeling a bit more adventurous and designing your own mandala make a few rows of simple stitches such as rows of dc’s (sc’) or a mesh as the centre of your mandala then add then add rows of flower motifs made separately and then joined together. Finish with a few more rows of your dc’s (sc’s) or mesh and add a pretty edging to finish.

Keeping your mandala in shape

Unless you are making a ruffle style mat then it is crucial to keep your mandala flat, if it’s pulling up add more stitches. If it’s ruffling up your tension is wrong try using a smaller hook or skip more stitches.

Colour

Try subtle shades of the same colour e.g. pinks ranging from pale to dark. Brights and clashing colours create a hot look perfect for summer garden furniture while pastels create a cooler more sophisticated look. Try combinations of brown and pink, red and pink, pale blue and lime, cream and grey for a classic look, with lime and sand, taupe and cream for a classy look.

Yarn

Generally the finer the yarn the smaller the finished mandala will be and the better the stitch definition.  Cotton is a traditional yarn for mandalas in 4ply or DK (light worsted) weight. Try also hemp blends, bamboo and acrylic yarns for a different look.


Choosing patterns

Written mandala patterns can look and can be complicated! Look for patterns with charts and good images to help you complete your mandala. 

Then it’s down to how you are going to display your finished mandala. I like to use mine on summer garden furniture, in garden rooms, conservatories and on garden furniture. They look perfect framed on embroidery hoops and displayed on walls. Mandalas as with any homemade crafts make lovely gifts.

Monday, 8 July 2019

Sirdar Snuggly Bouclette

Part of their baby range baby bouclette is super soft so not only great for babies but also for scarves and hats. The yarn is made with a twisted mesh of looped fibres that great the boucle bobbly effect. It’s a luxury yarn made up of 36% nylon, 37% wool and 27% acrylic that needs a gentle wash.

I used a 4.5mm hook and my favourite colour daffodil. There are twelve colours to choose from that includes, heather, powder, storm, spearmint, silver, soft lavender, lagoon, white, rose and ocean. Each 50gm balls produces 95m/104yards of yarn. Bouclette is not the easiest yarn to use but well worth the effort.


Thursday, 27 June 2019

Using Specialist yarns in crochet projects


I like to treat these yarns as specialist basically anything that has significant different elements from plain yarn such as:
  • Boucle
  • Yarn textured with a slub
  • With a metallic strip running through the yarn
  • Any yarn with sequins added
  • Faux Fur
  • Recycled T shirt yarn
  • Twine
  • Mohair

If theory you can use different yarns together as long as they are the same weight, but combining e.g boucle with plain yarn in crochet projects will not only create a completely different look but can affect the tension of your project. Using specialist yarns either on their own or in combination is easier in more flexible projects such as scarves, cushions and throws. Combining and using specialist yarns becomes more difficult if you are making garments when size and tension is crucial. 

Specialist yarns are usually more expensive so it makes sense to use them for the borders and trims on scarves and cushions. This works well with boucle yarns and yarns with slubs. You can also use these yarns as the main motif of a throw and use a plain yarn for joining and this works well in baby blankets. It makes sense that whatever you are making try a sample first

Use textured yarns for stripes in scarves and cushions. You can do this with boucle, faux fur, sequined and metallic yarns.

Metallic yarns can be tricky to work particularly if they have sequins through the yarn, they work beautifully for crochet evening bags as the main yarn or as a trim.

Twine is the ideal yarn for crochet baskets and I love to combine them with recycled T shirt yarns.

Some of my favourites
  • Sirdar Crofter
  • Sirdar Alpine
  • Sirdar Soukie with sequins
  • Nutscene have a fantastic selection of jute twine and string, fluorescent to subtle colours and everything in between
  • Wool and the Gang have a small but quality selection of recycled t shirt yarns
  • Rico Essentials mohair is a lovely combination yarn


Tuesday, 4 June 2019

Planning a Summer Crochet cushion or Pillow


Summer cushions make lovely crochet projects and I love to crochet them sitting in my garden on warm sunny days. Handmade summer cushions are perfect for garden furniture, garden rooms and conservatories.

Make your summer cushion as simple or as complicated as you like. Even the simplest designs look stunning with the right choice and right combination of colours. Granny squares always make a lovely cushion or simple rows of dc’s (sc) with a few rows of popcorn stitches stitched with pops of colour look gorgeous. It’s often the colours you choose that make a design original to you and make it a stand out piece of work. 

The shape of your cushion also influences design and not every cushion or pillow has to be square. I love bolster cushions and they work really well for garden furniture and garden benches. Round cushions look very pretty and oblong shaped cushions also work well, but one of my favourite cushion styles is square oversized, they have real impact.

When it comes to yarns summer cushions work perfectly in cotton and cotton blend yarns and one of my all time favourites is Scheepjes Cotton fun. You can read a review of this yarn here. It comes in a whole range of beautiful colours from subtle to bright, giving you a fantastic choice for your summer cushion.

When it comes to colour for my summer cushions I love soft cream and whites with pops of colour or very bright throughout with clashing colours such as orange with bright pink, lime with blue. Somehow they look good on garden furniture on warm summer days.

Your summer cushion might be made with motifs or rows of crochet and you can make groups of smaller motifs stitched together to make a larger motif. see an example of this here. The simplest way to make a cushion is to create a rectangle whether this is made up of motifs or stitched row by row. When you have made your rectangle of crochet simple fold over to make an envelope style cushion and if you want to make it even simpler crochet together on the right side with a contrasting yarn.

Summer cushions don’t have to be for your garden furniture they make lovely housewarming gifts and cheery gifts for someone who is not well.

Find comfy crochet cushion patterns here.....

Wednesday, 22 May 2019

Choosing Yarn for your Crochet throw

The patterns, designs and styles you choose for your crochet throws are probably the first thing to inspire you, but the yarn you choose is as crucial to the success of your crochet project. For throws and blankets I like to use Acrylic blends they are hardwearing, soft and easy care. The blends I choose as well as including Acrylic depend on what I’m making. Wool for picnic blankets, nylon, cotton  and merino blends for baby blankets and throws for the lounge or bedroom.

Some of my favourites are Sirdar Snuggly, Sirdar Dapple and Sirdar No 1 and Scheepjes Cotton Fun . Both Caron and Sirdar have a wide range of acrylic blend yarns. Acrylic yarns and blends wash well and are hard wearing with some specifically spun for baby projects perfect for baby blankets and soft throws.

Cheap or expensive yarn what’s the difference? 
Cheap doesn’t always mean inferior, as a better guide, gauge the yarn content against what it is you are making. Important is the yardage on the ball band and bear in mind that not all yarns of the same gauge and weight per ball or skein produce the same amount of yarn. Some expensive yarns for example have a greater yardage than cheaper equivalents. Add one expensive yarn to your throw and it will lift the whole design.

Should you stick to the yarn recommended in the pattern?
There is no doubt that yarns of the same weight vary greatly in the finish they produce. I’ve experimented with different yarns of the same weight and the same pattern and produced very different results, from smaller stitches to different length and different widthways tension. If you want to use an alternative yarn to the one recommended in your pattern check your tension carefully and adjust your hook size as necessary.

Should you go for mass produced or independent spinner and dyer?
Hand dyed yarn is gorgeous  and usually produces unique colour ways. If your throw is a gift or something for a special occasion then buying from an independent dyer is the one to go for.

Colour choice 
Mass produced yarn ranges offer the greatest choice of colours. The more popular the yarn the bigger the choice of colours. Acrylic baby yarn blends usually come in a wide range as do economy yarn ranges. Are you going for brights, subtle shades or contrasting yarns. Look for a wide selection of colours such as Scheepjes colour crafter. Bonus yarns are a good choice for main colours.

What weight?
My favourite is DK (light worsted) weight. Crochet grows quickly and shows good stitch definition. Chunky and Aran weights grow more quickly but stitch definition is not as good. 4ply and lace weight yarns look beautiful but take a long time to make!

Find throw pattterns here.....

Thursday, 16 May 2019

Designing a Crochet Throw


 It’s easier to design a crochet throw or cushion than you think! Even with the most basic crochet knowledge you can create a throw, just by using a basic granny square you can make a stunning crochet throw to your own design. Use groups of motifs randomly, in colour groups or in bands all look effective. It doesn’t matter how simple the motif you choose, pick the right colours and you will have something that looks lovely and is a true one off. 

By combining motifs in rows or strips of crochet interspersed with rows of simple crochet makes keeping the edges of your throw straight and in shape easier to achieve.  

Five ways to create your own design throw or cushion.....

This is one of my favourite designs. Depending on how big you want your throw to be start with 3 or 5 motifs joined together with a back stitch to make a strip. This will make an oblong throw. Now crochet round these motifs around all sides almost as if you are crocheting in the round. Do this for a few rows then make four strips of motifs to add to the four sides of your throw. 

Use any size of motif and join together to form a strip, odd numbers of motifs work best for this. Then with the right side of your motifs facing join your yarn and work into the stitches on the motifs and work a few rows of plain dc’s (sc’s) or tr’s (dc’s). Repeat for as many rows to make the length of your throw.

Use two different design of motifs in your chosen colours, make one of the motifs plain. Then use one style of motif to make the diagonals of your throw and fill in with your other motif.

Make blocks of smaller motifs and stitch together or crochet together to form one large motif, then stitch these larger motifs together to create your throw. This works really well if you use the same simple motif but mix up the colours and introduce some blended yarns. This is an excellent way to make granny square motifs to make something very special.


 Check out pinterest online for more inspiration! Find my throw patterns here.....


Monday, 29 April 2019

Perfect crochet projects for spring and Summer

If like me you love to crochet warmer weather will not stop you wanting to create something and indulge in crochet projects. When the weather is hot it’s good to crochet something simple and something you can make while sitting in the garden, during your lunch break,  sitting in the park when you are on the beach and when you are on holiday.

It helps to have crochet projects that don’t use too many different colours, multiple balls and different yarns to carry around. Cotton yarn is the obvious choice for summer projects as cotton is cooler to work than wool and acrylic based yarns. My favourite cotton yarns include Sirdar Cotton DK (light worsted), Scheepjes Cotton Fun and Patons 4ply cotton.  Scheepjes cotton Fun comes in a fantastic range of bright colours, perfect for Summer projects and summer cushions. Patons 4 ply cotton has a range of colours ideal for making bright mandalas. Linen and bamboo yarns are also soft and cool to use in the summer. Avoid alpaca and mohair yarns and blends for summer crochet projects.

When the weather warms up what crochet projects can you take on? Motif based projects are the obvious choice. I also love to make crochet toys in cottons and to make large summer bolster cushions. Summer shawls in lightweight yarns are also easy to transport and easy to make in the summer.

Use small click topped boxes to secure your hooks, scissors, needles for end fastening and stitching motifs together. I also like to include my elephant cutter which includes a small measure for checking sizes and a yarn cutter.

Sounds obvious but I love crochet summer projects that produce useful finished items. Garden table mats, coasters and bowls and baskets in cotton and linen yarn on hotter days are perfect summer crochet projects. The great news is that once finished you can use them for your garden parties and barbeques.

Monday, 4 March 2019

How to crochet a beach bag

What yarns to use to make your bag?
Cotton and cotton rich yarns work best, they make bags more rigid, are hard wearing, but still soft. Use a wool based yarn and your bag is more likely to stretch. My favourites is Sugar n Cream an Aran weight yarn, but I also love Drops cotton yarns and Scheepjes soft fun is an excellent yarn for bags. cotton linen blends. Cotton made bags are usually washable, ideal for the beach and summer picnics.

What stitch to use for your bag?
Double crochet (single crochets) stitches work well, as do half trebles (half double crochets). You can also use a looser stitch or open work style crochet when the lining will show through and this can look very effective. Front and back row post stitches also look good, create pretty ridges and are useful for defining changes in rows.

Options for the construction of your bag
I like to make my rectangular crochet bags in 4 or 5 pieces. That is a front, back, 2 side gussets and a bottom piece, plus handles. Making your crochet bag in this way will make your bag more roomy. However you can make a bag with just a front, back and bottom piece. If you prefer a simpler style and one that is easier to make and easier to construct, just make a front and back and join together on three sides. With this option line it in the same way as a 5 piece bag, that is line your pieces separately, then join together using a back stitch.

Lining
If you can, line your bag with a cotton or cotton rich fabric to protect it and reduce the chances of stretch. This really does make bags look better and more professional, see my orange/pink bag above. Make lining pieces for the front and the back. Turn in half an inch (1.27cm’s) leaving a gap of one row of crochet. This will make it easier when you join your crochet pieces together and will create a neater finish.

Putting it all together after you have added the lining
Attach the side pieces to the front or back of your bag using matching yarn and a backstitch. Join this to the base of your bag. Finally attach the front to the sides and bottom. A ttach handles to your bag.

Handles and straps.
I like strong carrying handles and there are different ways to achieve this. You can make a strip of crochet using dc’s (sc’s) for your handle and double it over when finished by stitching the sides together.  Alternatively use your yarn double and doing this creates a lovely strong effect. You can also buy leather and wooden handles in craft stores and these work well.  Another alternative is to make thinner handles by making a length of crochet and stitching around strong plastic tubing which you can buy from craft stores. I make shoulder straps in the same way as handles for some of my bags, see my patchwork over shoulder beach bag. 

Fastenings
I like to vary these. Sometimes I make a drawstring top to my bags by making 2 chain holes in rows of crochet. This I do by crocheting in dc’s (sc’s) or half trebles (half dc’s) with one row of holes between to make a professional looking top to your bag and to make it stronger. If you do this make sure you make at least four rows on top of your holes. Crochet a drawstring using chains or dc’s (sc’s) on chains and thread through. You can also add tassels, small strips of crochet stitched to your bag for clipping on keys.  Sometimes I use a button fastening (you can find how to crochet a button in tutorials on my web site) and loop fastening or a zip. Zips make your bag more secure but require more dressmaking skills!


Wednesday, 2 January 2019

Lace Crochet

Traditionally lace crochet used fine cotton threads to make round mats (doilies) table runners, lace collars and tablecloths. Now thanks to better choice and a wider selection of cottons and threads we can make traditional lace crochet without having to resort to the very fine traditional cottons (thread). DMC petra for example comes in sizes from 3, 5 and 8 all of which come in a range of lovely colours. Use them to make traditional crochet lace and you will produce stunning results without losing out on quality.

 Table runner
The wonderful thing about the colour selection of cotton threads is that you can now create table runners and covers for modern settings as well as the more classic designs. Don’t restrict making lace crochet to the more traditional styles. Lace crochet creates light airy structures perfect for creating lace shawls and lightweight scarves and you can do this with DK (light worsted) or 4 ply yarns.

Make crochet lace as simple or as intricate as you like. For beginners to crochet rows of basic shells creates a simple but very pretty lace finish and would make a stunning crochet long style scarf or cowl, particularly if you use a blended yarn. Basic net crochet is a good place for beginners to crochet to start with lace. Net crochet in its simple form is created by making 1 or 2 ch spaces between trebles (double crochet) and it’s very simple to make using fine thread or yarn. Add in groups of 4 trebles and make filet crochet which can be used to create designs and images, everything from birds to people, houses and animals.

You can also use net crochet combined with clusters and shells together in one row or make a scarf with simple net crochet and add a scalloped edge to create a stunning scarf with a simple design.  Use lace crochet to make round or square motifs and you can do this with fine cotton or thicker yarn. As with other lace projects make your motifs as simple or as complicated as you wish. Granny squares for example made in a finer yarn creates a very pretty lace effect.
 Lacy crochet Scarf

Irish crochet lace has always had its own style creating simple motifs in a variety of shapes, including spirals and leaves which have particularly featured in traditional Irish crochet. For more experienced crocheters this has developed from its own traditional style into free form crochet.

Sunday, 7 October 2018

Not all Crochet motifs have to be square or round

Choosing a crochet project with motifs has many benefits. Firstly you can make a motif when time is short, secondly you can crochet on the go and lastly motif based crochet projects grow quickly. Traditionally we make motifs square or round, but not all motifs have to be shaped this way. With a little imagination you can add a new quality to your crochet projects and give yourself more design options with more unusual shaped motifs.

Irish and free style crochet traditionally use free form shapes and you can use these for inspiration. Don’t think that anything other than a square or round motifs will be difficult to make or difficult to crochet together. Triangular motifs for example can be easily fitted together to make a square giving you flexibility to create spectacular designs with the colours you use.

Joining together
As with square or round motifs you have many options when joining your more unusual shaped motifs together.  You can add a filler to make joining easier and this works well with crochet shawls. Base your filler on the centre of your main motif. Most non square or round motifs start in the same way with the same basis as square and round motifs, allowing you to use the middle part of your main motifs to create your filler. Check out my fan shawl to see how this works.

As with more traditional motifs you can use a lacy stitch to join your motifs together or use a simple slip stitch join motifs.  Alternatively stitch your motifs together and doing this will create a denser effect to your finished project. The motifs of my peacock scarf crochet were crocheted  together to create a pretty ridge effect.

If all else fails and you would like to make a throw or shawl using more unusually shaped motifs but  lack the confidence to do this, you can turn your square motifs on their side to create diamonds. You don’t even have to make filers just leave the edge of your throw jagged to give a pretty effect.

Creating your design
As with square or round motifs make your unusual shaped motifs plain or multi coloured or use plain motifs with a different or blended coloured joining stitch. Graph paper does help create designs with more unusually shaped motifs and I sometimes make a few motifs and experiment to work out the best way to join them together. You can use this method as the basis for creating shawls, throws and blankets. Make four or six motifs and find the best way to join these together then use multiples of the six motifs together to create your project.

Wednesday, 29 August 2018

How to Create Picture Crochet

Otherwise known as Intarsia you can use picture crochet to create a variety of crochet projects. For example one large crochet image for a cushion or a bag or make smaller motifs for cushions and scarves. You can use any weight of yarn for Intarsia crochet, but DK (light worsted) and 4ply (sport weight) work best. You will need to use a yarn with a good stitch definition or your design will be lost. Once you have perfected the yarn change of Intarsia using this style of crochet makes easy crochet projects as usually only one stitch is used, usually dc’s (sc’s).


Intarsia hints and tips


If you are using multiple colours wind small balls to reduce ‘taffle’
Start with two colour designs to build your confidence
Always carry the yarn across the back of your work
Don’t crochet over the yarn you have carried across the back or you will create double thickness fabric
For long stretches of one colour ‘catch up’ the yarn once or twice to avoid long stretches of yarn strands
Take care not to pull up your work as you carry the yarn across the back of your work
For an example of picture crochet see large square cushion


What can you make using Intarsia Crochet?


  • Cushions
  • Bags look fantastic using Intarsia designs check out Wayuu bags from Columbia and South America on Pinterest
  • Scarves with snowflakes
  • Tartan cushions and scarves
  • Cushions with flowers
  • Flowers and leaves work well
  • Animals such as cats, dogs, rabbits work well as do birds and look great on children’s clothing
  • Contemporary designs such as triangles, zigzags and oblongs

Where to find inspiration and original design ideas?

Anything that can be turned into a grid will work, cross stitch patterns with grids are a good resource or you can place a grid over an image you like. The design you choose shouldn’t be too complicated as it is difficult to create shades with crochet. Check that the grid will fit your crochet work, use 1 stitch on the grid as one or two stitches in your crochet. Crochet Patchwork Bag. 

Friday, 30 March 2018

Square motif Poncho blog

Violet/purple is the colour for 2018 so I decided to choose it for something a little bit special! Poncho’s can be tricky to make with different shapings and joinings. By making this crochet poncho based on a pretty motif, it’s much easier to put together and gives you the flexibility to change the size of your poncho so you can easily make it any size you like, by adding or taking out motifs. Using  the plan provided with the pattern it will be easy to do this. Remember to keep a check on the size of the neck opening. Make for yourself or make a smaller version smaller for a child.


The motif in this pattern is not the traditional granny square; I’ve added some popcorns to give the poncho more texture and interest. This design is quick to make with an easy repetitive pattern. If you are a crocheterer who want an easy relaxing pattern with clear instructions, then this one is for you!
Make this lovely lighter weight poncho for yourself or as a gift.

If you want a chunkier poncho use a chunky or Arran weight yarn and make fewer motifs. The pattern includes a plan and an image file with tutorials to help you make your poncho. When finished block your motifs to square them off. A pretty tassel edging around the bottom and a generous loop stitch border around the top have big impact and make this an interesting crochet project to make.

The lovely thing about this poncho design is once you have made a couple of motifs you can use them to make other things such as a baby blanket, throw or table runner. Find the pattern here.....
This pattern suitable for beginners to crochet

Friday, 23 March 2018

Tapestry Style Crochet Cushion with Large Squares

Designing and creating beautiful crochet designs that are simple and rewarding to make is my life’s work! This cushion designed in 2018 is a modern contemporary design and the large squares and blocks of colour have big impact.

My inspiration was the wonderful Aztec tapestry design bags created by South American crocheters. While tapestry crochet has been around for a while these crocheters have taken it to a whole new world of possibilities. Tapestry crochet is very simple to make and can be used to create elaborate designs and pictures.

I used two toning colours for the design I created the cushion so the colour changes are easy. Make it in black and white for a very contemporary design perfect for a modern home. The design uses only double crochet (single crochet) stitches so is very easy to make, once you have mastered how to change colours and the pattern include a tutorial on how to do this.

Make the cushion bigger by adding more blocks widthways or lengthways, just keep your proportions OK and the design would make a lovely floor cushion with six blocks square. As with all designs change the colours you change the look of your project completely.

I added a checkerboard effect border to add interest and to make the main design stand out as if framed. Full instructions included in the pattern. Grab the pattern here.....

Thursday, 15 March 2018

Sparkle Crochet Infinity scarf with Sparkly triangles

Everyone loves a bit of sparkle! Sparkle isn’t just for evenings and Christmas celebrations. Sparkle works really well when combined with other yarns to brighten up dark Winters day and when days are cold. And it doesn’t just have to be a scarf, sparkle yarn would look lovely on a hat or used to make a very special throw.

This gorgeous stylish scarf not only looks pretty but is also dense and warm. You don’t have to use a sparkly wool or an iridescent such as ??? would work well. This is an easily adaptable pattern you can make your scarf wider, longer, change the stripes and add more, whatever you like!

I mainly used the sparkly yarn for the surface crochet in this crochet scarf design, but I added a few stripes in the sparkly yarn to bring the design together. Surface crochet is easier than you think and is very relaxing to do. I added a pretty, but simple, edging to finish it off to perfection and also to hide a few straggly ends! Push the boat out with tassels or a large sparkly flower and you have a very special scarf.

As always this design I created to be adaptable, you could use it to make a poncho, throw, or hat. Full details on how to do this are included in the pattern. Grab the pattern here.....

Thursday, 8 March 2018

Triangular Crochet Poncho

Violet/purple is the colour for 2018 that’s why I chose it! Poncho’s can be tricky to make with different shapings and joinings. By making this crochet poncho in motifs it is much easier to put together and gives you the flexibility to change the size so you can easily make it any size you like, by adding or taking out motifs. Use the plan provided and it will be easy to do this, just remember to keep a check on the size of the neck opening. Make for yourself or smaller for a child

The motifs are not the traditional granny square; I’ve added some popcorns to give the poncho more texture and interest. This design is quick to make with an easy repetitive pattern. If you are a crocheterer who want an easy relaxing pattern with clear instructions, then this one is for you!
Make this lovely lighter weight poncho for yourself or as a gift. If you want a thicker chunkier poncho use a chunky or Arran weight yarn and make fewer motifs.

I’ve included a plan and an image file to help you make your poncho. Block motifs to square them off. A pretty tassel edging around the bottom and a generous loop stitch border around the top make this an interesting and different pattern to make.

The lovely think about this design is once you have made a couple of motifs you can use them to make other things such as a baby blanket, throw or table runner. Find the pattern here.....


Pattern suitable for beginners to crochet

Thursday, 1 March 2018

Popcorn Square Crochet Baby blanket

Baby blankets should be soft and warm that’s why I chose Sirdar Snuggly Crofter yarn to make this warm baby blanket. I used textured stitches to create a double layer and I chose motifs to make the design more flexible and more interesting to work.

Sirdar Snuggly yarn comes in a wide range of colours from pastels to punchy brights. Baby Crofter is a blended yarn, part of the Snuggly range. Again choose from pastels or opt for brighter colours. I picked the pale pink, pale blue and pale yellow blend, then combined it with a pale blue from the plain colour range to soft green, pink or coral would look equally as pretty.

I’m a bit addicted to making crochet popcorns and they bring a lovely texture to this double thickness soft baby cover. As well as using popcorn stitches in the motifs. I decided to add them to the border, which is a bit unusual but I think it works well. This baby blanket is a lovely project to work which you could easily make larger by adding more of the two crochet motifs to make a larger blanket.

Using lovely soft wool and a basket weave stitch creates a beautiful double thickness but light weight baby blanket. The stitch is repeating and in many ways is easier to make than traditional crochet as the main stitch is worked around stitches rather than into loops and it’s quicker to work.

The popcorn stitched edging looks lovely and are easy to make but if you wish you could easily miss them out and the blanket would look just as pretty. Use double crochet (sc) or half trebles (hlf dc’s)  in the edging if you decide not to include the popcorns. Grab the pattern here.....

Tuesday, 20 February 2018

Acorn Trim Crochet Infinity scarf

I love infinity scarves. Wear them loose or wrapped around, they are warm and chic. This one is bang up to date in new season hot colours and on trend stripes this lovely infinity scarf has decorative crochet acorns. Crochet scarves are one of the most exciting projects to make, they get bigger quickly and there are so many choices of design and yarn to use.

I created this design in sections, so you can see how quickly your project is growing. Many infinity scarves are crocheted in net stitch. I’ve made this one more interesting to work and prettier to look at by adding some simple crochet picots. The very interesting acorns are easy to work and bring more to the design.

Change the colours of this scarf to oranges and reds for an autumn scarf or paler pastel shades in a soft cotton would work well in Spring. It’s easy to make your crochet scarf any length you want by adding more panels.Grab the pattern here.....

Thursday, 1 February 2018

What's in a name?

Discovering new crochet stitches and techniques in books, online and in blogs can be both inspiring and intimidating. The names of stitches and techniques can vary and be confusing. This can mean nothing to you or stand for time spent learning something new rather than starting a new crochet project! Sometimes it’s the abbreviations that can put you off or reams of text describing new stitches you need to make to complete the pattern.

It can be even more intimidating if the new techniques and specialist stitches use particular equipment such as with broom stick crochet. Or crochet hooks that look more like knitting needles for Tunisian crochet! The decision is, is it worth investing in new equipment? Will you be able to make good use of it?

I urge you not to be intimidated by having to learn something new and so stick with your tried and tested crochet designs and styles. Incorporating new stitches and techniques in a crochet project makes the project more interesting to work, results in a high class finish and you create a stand out project.

The chances are you’ve already used some of the stitches and techniques in more intricate patterns or have the skills you need and you do not realise it. For example my peacock leaf crochet scarf uses Tunisian crochet (not named in the pattern) but you do not need any specialist equipment to make this crochet scarf. The Tunisian crochet in this design is simple enough for a newbie to crochet to make.

More often than not the pattern you are looking at is much simpler than it at first appears. To give yourself confidence in tackling something new it’s worth using a simple design or pattern that you are familiar with and adding a few specialist stitches. As always keep a check on your tension. You can for example easily change a pattern that uses groups of trebles(double crochets) for cross trebles (cross double crochets). This will use the same number of stitches and looks very pretty. 

If your design uses a mesh pattern add a picot to the chains between stitches. For example if your pattern asks for 3 chain to make the spaces then make 4 chain with a dc picot into 3rd chain from the hook with another chain to complete the mesh gap. It will look so much more attractive than a plain mesh.

If your design uses groups of trebles (double crochet), crochet around the stem of the stitch on the row below, this makes a denser finished project, but uses the same number of stitches and creates a completely different look.